200 Lumen Trionic LED Front Light

This manual both shows how you attach the LED light on a Walker (left column below) and also how you attach it on a Veloped (right column below).

In the left-hand photo, A shows the holder attachment parts for a Walker (2 screws + 2 washers). B shows the holder attachment parts for a Veloped (1 screw + 1 knurled nut + 1 nut).

200 Lumen Trionic LED Front Light

Attaching the Light Holder

Instructions for a Walker

Of the two rubber straps included,choose the one with a 10-degree angled light attachment section.
A1. Of the two rubber straps included,choose the one with a 10-degree angled light attachment section.
Push the light into the slot of the strap until it snaps in place.
A2. Push the light into the slot of the strap until it snaps in place.
Attach the light to the Walker, either on the semi-vertical frame tube just below the height adjustment quick-release lever, or on the black semi-vertical grip tube.
A3. Attach the light to the Walker, either on the semi-vertical frame tube just below the height adjustment quick-release lever, or on the black semi-vertical grip tube.
Pull the strap tight and fix it with the plastic hook.
A4. Pull the strap tight and fix it with the plastic hook.

Instructions for a Veloped

Of the two rubber straps included, choose the one with a 0-degree angled light attachment section.
A1. Of the two rubber straps included, choose the one with a 0-degree angled light attachment section.
Push the light into the slot of the strap until it snaps in place.
B2. Push the light into the slot of the strap until it snaps in place.
Attach the light to the Veloped, preferably the right or left of the hinge on the U-shaped grip bar. Pull the strap tight and fix it with the plastic hook.
B3. Attach the light to the Veloped, preferably the right or left of the hinge on the U-shaped grip bar. Pull the strap tight and fix it with the plastic hook.
Pull the strap tight and fix it with the plastic hook.
B4. Pull the strap tight and fix it with the plastic hook.

Instructions for Use

The package contains

Caution

It is normal for the battery to reach a high temperature (up to 104°F / 40°C) during charging due to chemical reactions within the battery. The battery may also become warm if it is not fully drained before charging.

Several factors can affect the battery's lifespan, including the type of cell, usage strain, maintenance routine, temperature, and the number of charge cycles. Generally, a higher battery capacity results in a longer operation time.

The battery capacity may decrease to approximately 80% of its original capacity after 300–500 charge/discharge cycles. With proper care, the battery can have a lifespan of up to 3 years.

Water resistant is for rain water only. Do not submerge the bat- tery or the whole light into water when cleaning. Clean the light with a soft damp cloth when needed.

Battery Performance

Battery performance is significantly affected by temperature variations:

Low Temperature: At 0°C, capacity decreases by 5–10%, reducing operation time by 50%. At -20°C, capacity drops by 30%, potentially shortening operation time by 70%. Performance returns to normal when the temperature rises to 20°C.

Self-Discharge Rate: At room temperature, the battery loses about 1% of its capacity per day. When stored at 40°C, the self-discharge rate increases, leading to a loss of approximately 5% of capacity per day.

To maintain optimal battery performance, avoid exposing it to extreme temperatures and store it in a cool, dry place.

If you do not use the battery for a long time be sure to recharge the battery every 3 months.

How to charge the battery

  1. Find the charging place at the bottom of the light.
  2. Lift the rubber cover to access the charging port.
  3. Plug the USB-cable into your USB-charger.
  4. Plug the charging cable into the light's charging port.
  5. The indicator shows red during charging.

The charging indicator turns green when fully charged.

Attention: Use the original supplied USB-cable to charge the battery. Unplug the charging cable once the battery is fully charged.
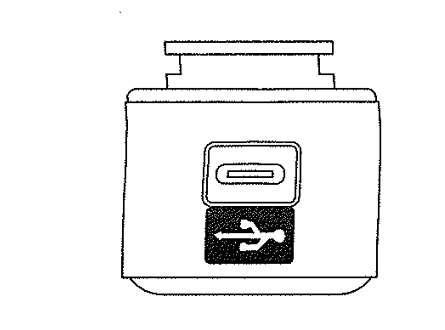
How to charge the battery

How to operate the light

Press and hold the switch for 2 seconds to turn the light on or off. Click once to cycle through modes.

Safe Mode

When the battery is low, the light will automatically switch to a 5-lumen steady mode, providing an additional 30 minutes of operation.

Product Reviews    

  • TRUE Enjoyment…

    I have had my new Trionic Walker for a couple of weeks and I couldn't be happier.

    I have gone on walks for miles and it has operated fabulous, no getting caught in cracks anymore, walked on gravel trails last weekend PERFECT!
    Pictures to follow, …

  • Freedom…

    I am grateful for the mobility and freedom from falling that trionic provides…

  • Trionic have thought of everything…

    Trionic have thought of everything. The Veloped Trek has made a world of difference to my being able to get out into the countryside to enjoy the scenery and the wildlife again, as it easily enables me to carry my cameras, binos, and all I need to st…

  • Rick Pope…

    I have both the 12” for inside and around the house and a 14” for outdoor travel. Love them both.…

  • My life has changed.…

    I cannot thank you all enough for my new Veloped Tour. It has opened up many things which I have been unable to do for the past 2 years. The main thing being country walks & trails, walking more than 3-4 kilometres which may not seem a lot but not b…

  • I would like to congratulate Trionic…

    I would like to congratulate Trionic for producing such a fine piece of engineering; the Trionic Veloped. The ease of ordering, customer service, packaging, ease of assembly and of course the Trionic Veloped itself have all exceeded my expectations.…

  • Excellent product with first class……

    Excellent product with first class customer support. Even telephoned to check a minor problem I had.

    Excellent. Would recommend.…

  • I know I have gained a lifetime of freedom.…

    I am a twenty six year old woman, born with a mild spastic tetraparesis (a lighter form of cerebral palsy). It affects both my hands and legs: despite years of physiotherapy, I was only able to walk arm in arm with a carer. I found out about Trionic …

  • Trionic Walker 14er is great for walking on……

    Trionic Walker 14er is great for walking on rough and unpaved streets. With this, I have increased my speed and distance. I added a bicycle speedometer/odometer to monitor my speed and distance. A great improvement over my 8-inch indoor walker.…

    Walker 14er Kit green/black/red
    by Douglas Sphar

Subscribe to our newsletter!

"> ?>